 Kia K900: Seat belt - Driver's 3-point system with emergency locking retractor
To fasten your seat belt:
To fasten your seat belt, pull it out of the retractor and insert the metal tab (1) into the buckle (2). There will be an audible "click" when the tab locks into the buckle.
The seat belt automatically adjusts to the proper length only after the lap belt portion is adjusted manually so that it fits snugly around your hips.
If you lean forward in a slow, easy motion, the belt will extend and let you move around. If there is a sudden stop or impact, however, the belt will lock into position.
It will also lock if you try to lean forward too quickly.
If you are unable to pull out the seat belt from the retractor, firmly pull the belt out and release it. Then you will be able to pull the belt out smoothly.
Height adjustment
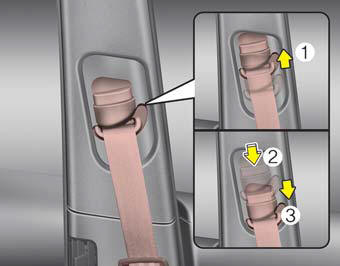
You can adjust the height of the shoulder belt anchor to one of the 4 positions for maximum comfort and safety.
The height of the adjusting seat belt should not be too close to your neck.
The shoulder portion should be adjusted so that it lies across your chest and midway over your shoulder nearest the door and not your neck.
To adjust the height of the seat belt anchor, lower or raise the height adjuster into an appropriate position.
To raise the height adjuster, pull it up (1). To lower it, push it down (3) while pressing the height adjuster button (2).
Release the button to lock the anchor into position. Try sliding the height adjuster to make sure that it has locked into position.
WARNING
Shoulder belt positioning
Never position the shoulder belt across your neck or face.
WARNING
Seat belt replacement
Replace your seat belts after being in an accident. Failure to replace seat belts after an accident could leave you with damaged seat belts that will not provide protection in the event of another collision.
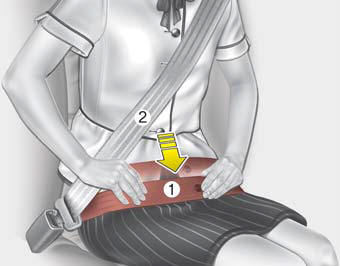
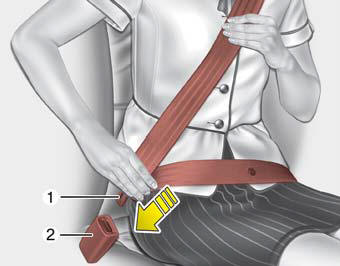
You should place the lap belt portion as low as possible and snugly across your hips. If the lap belt is located too high on your waist, it may increase the chance of injury in the event of a collision.
The arm closest to the seat belt buckle should be over the belt while the other arm should be under the belt as shown in the illustration.
 Seat belt warning (for front passengerŌĆÖs seat)
The front passenger's seat belt warning light will activate to the following
table when the ignition switch is in "ON" position.
*1 The seat belt warning light will go off if the ...
 Seat belts - Front passenger and rear seat 3-point system with combination locking
retractor
Seat belts - Front passenger and rear seat 3-point system with combination locking
retractor
To fasten your seat belt
Combination retractor type seat belts are installed in the rear seat positions
to help accommodate the installation of child restraint systems.
Although a combination retr ...
See also:
To temporarily accelerate with the cruise control on
If you want to speed up temporarily when the cruise control is on, depress the
accelerator pedal.
Increased speed will not interfere with cruise control operation or change the
set speed.
To ret ...
Speedometer
The speedometer indicates the speed of the vehicle and is calibrated in miles
per hour (mph) and/or kilometers per hour (km/h).
The unit of the speedometer (Type B) can be changed from km/h to MP ...
Battery recharging by battery charger
Your vehicle has a maintenance-free, calcium-based battery.
If the battery becomes discharged in a short time (because, for example,
the headlights or interior lights were left on while the veh ...
Categories
